前言
延續上集 C# 多執行緒 – (1)概念篇, 對執行緒的運作有了概念後, 下集將來演示如何在 .NET C# 環境下, 建立與使用執行緒.
主旨
透過使用 .NET 的 System.Threading 類別庫, 進行以下操作:
建立並執行執行緒 (有/無傳遞參數)
等待完成/時間
共用資源及排它鎖
背景執行緒
建立並執行執行緒
建立執行緒時, 可以傳入 2 種委派 (Delegate) 方法, 分別是:
public delegate void ThreadStart()
public delegate void ParameterizedThreadStart(object obj)
先建立符合 2 種委派的函式: LoopPrintTask() 與 LoopPrintTaskParameter()
static void LoopPrintTask()
{
    for (int i = 0; i < 300; i++)
    {
        Console.Write("#");
    }
}
static void LoopPrintTaskParameter(object message)
{
    for (int i = 0; i < 300; i++)
    {
        Console.Write(message.ToString());
    }
}
接著 Main() 中也建立 2 個執行緒, 且建構式傳入上述 2 個委派函式. 當呼叫 Start()時, 執行緒才開始運行.
static void Main(string[] args)
{
    Thread th1 = new Thread(LoopPrintTask);
    Thread th2 = new Thread(LoopPrintTaskParameter);

    th1.Start();
    th2.Start("-");
}
運行後注意到, 每次非同步印出結果都不一樣, th1 與 th2 都分別會獲得一小段執行時間, 時間到了 CPU 就會切換到下一個 Thread 執行, 這樣交替進行著, 就會有 2 個執行緒同時執行的錯覺.

等待執行緒: 完成或暫停
如果我們想要等待某執行緒完成工作後再繼續處理其他工作, 可以透過呼叫 Thread 物件的 Join() 函式:
static void Main(string[] args)
{
    Thread th1 = new Thread(LoopPrintTaskParameter);
    th1.Start("-");

    th1.Join();
    for (int i = 0; i < 300; i++)
    {
        Console.Write("O");
    }
}
Join() 函式之後的程式碼, 要等到 th1 完整印出 300 個 ‘-‘ 字符後, CPU 才會切換回主執行緒 (即運行 Main() 的執行緒).

倘若我們只是需要執行緒稍微休息幾秒, 也可以透過 Thread 類別的靜態函式 Sleep(int millisecondsTimeout) 暫時停止正在運行的執行緒.
static void Main(string[] args)
{
    Thread th1 = new Thread(LoopPrintTaskParameter);
    th1.Start("-");

    for (int i = 0; i < 300; i++)
    {
        Console.Write("O");
    }
}

static void LoopPrintTaskParameter(object message)
{
    Thread.Sleep(1000);
    for (int i = 0; i < 300; i++)
    {
        Console.Write(message.ToString());
    }
}
修改 LoopPrintTaskParameter 函式, 使得執行該函式的執行緒在迴圈之前休息 1秒.
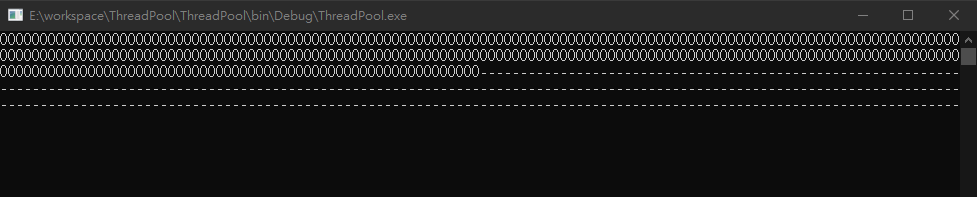
由於 Main() 迴圈只跑了 300 次, 通常能夠在 1秒內印完全部的字符. 然而 1秒後, th1 才開始迴圈印出字符.
使用共用資源
執行緒之間也能夠共享資源, 而資源指的就是變數 (variable). 共享變數的情況很常見, 如果都是讀取變數值, 並不會有問題. 但如果需要修改變數值, 就必須使用一些技巧避免修改而導致數值錯亂的情況.
新增一個 ShareVariable 類別, 存放私有變數 count, 並於 ShareVariable 建構式中建立 2 個執行緒.
static void Main(string[] args)
{
    ShareVariable SV1 = new ShareVariable();
}

class ShareVariable
{
    private int count = 0;

    public ShareVariable()
    {
        Thread th1 = new Thread(AddCountTask);
        Thread th2 = new Thread(AddCountTask);

        th1.Start(300);
        th2.Start(300);
    }

    private void AddCountTask(object paramDelay)
    {
        count++;
        Thread.Sleep((int)paramDelay);
        Console.WriteLine("Count: {0}", count + " on thread: " + Thread.CurrentThread.ManagedThreadId);

        Console.ReadLine();
    }
}
ShareVariable 建構式的行為類似新增購物車項目, 分別建立 2 個 Thread 添加項目至購物車 (即 count++). 然而在 count 增加後故意延遲 300ms, 讓 th1, th2 都確實執行 count++ 後, 在印出count 數值. 結果, 2 個執行緒輸出相同的結果.

有時候共享變數會導致嚴重的後果, 尤其涉及金流方面. 當某執行緒正在計算某筆訂單的過程時, 還未計算完, 另一個執行緒修改了共享變數的值, 讓原本的結果從15000 變成了 23000. 這時候只能乖乖被客訴了.
鎖
為了解決共享變數修改上衍伸的問題, 利用排它鎖 (exclusive lock) 強制讓多個欲修改共享變數的執行緒排隊, 使它們同步化 (synchronization).
我們修改 ShareVariable 類別成另一個 LockTest 類別. 新增一個私有變數 locker, 作為排它鎖, 變數型態可以為任意參考型別, 在此先用object.
class LockTest
{
    private int count = 0;

    // shared lock object
    private object locker = new Object();

    public Lock()
    {
        Thread th1 = new Thread(AddCountTask);
        Thread th2 = new Thread(AddCountTask);

        th1.Start(300);
        th2.Start(300);
    }

    private void AddCountTask(object paramDelay)
    {
        Console.WriteLine("Current thread {0}", Thread.CurrentThread.ManagedThreadId);

        // get locker or wait others release locker (thread-safe)
        lock (locker)
        {
            count++;
            Thread.Sleep((int)paramDelay);
            Console.WriteLine("Count: {0}", count + " on thread: " + Thread.CurrentThread.ManagedThreadId);
        }

        Console.ReadLine();
    }
}
lock 關鍵字語法使用的鎖 (locker 物件) 所包含的程式碼區間, 只有擁有鎖的執行緒能執行, 若鎖被其他執行緒持有, 便會等到鎖被釋放後再請求索取該鎖. 如此以來, 就能保證 lock 區間同一時間只有 1 調執行緒能進入, 防止資料錯亂. 我們也可以說它是「執行緒安全的」(thread-safe).

不過, 使用排它鎖技巧時要注意避免 2 條執行緒互相等待對方釋放鎖造成的死鎖 (deadlock) 情況.
背景執行緒
執行緒依照行為來區分, 執行緒可分為前景執行緒和背景執行緒. 2者的差異是, 當前景執行緒停止時, CLR 會停止所有背景執行緒, 並結束應用程序. 若只是停止背景執行緒, 並不會讓應用程序停止. 所以, 通常會把必須執行的工作放到前景執行序, 而相較不重要又可以中段的工作則放在背景執行序.
使用 .NET using System.Threading 建立的執行序都屬於前景執行序. 可以透過 Thread 物件的 IsBackground 屬性更改成背景執行序.
static void Main(string[] args)
{
    Thread th1 = new Thread(LoopPrintTaskParameter);
    th1.IsBackground = true;
    th1.Start("-");

    // the program will be done if th1 is background-worked thread
    // the program will Not be done if th1 is foreground-worked thread (default)
}

static void LoopPrintTaskParameter(object message)
{
    for (int i = 0; i < 300; i++)
    {
        Console.Write(message.ToString());
    }
}
新建的執行序被修改成背景執行序, 而 Main() 執行到 th1.Start() 後應用程式就會被停止, 不會等到 th1 印完 300 個字符.
總結
C# .NET Thread 的操作到這告一段落, 簡單認識下執行序如何使用. 一般情況下不建議直接建立執行序, 其實 Windows 市集應用程式無法使用 Thread類別, 反而會用另一種執行序集區 (Thread Pool) 來處理非同步的工作. 主要是避免開發者不熟練而過度使用/創建執行序. 之後有機會也會來研究下執行序集區.
謝謝觀看:D
參考
C# 學習筆記:多執行緒 – https://www.huanlintalk.com/2013/05/csharp-notes-multithreading-2.html
C# 執行緒 Thread / ThreadPool – https://csharpkh.blogspot.com/2019/09/CSharp-Thread-ThreadPool-Start-Wait-Join-Cancellation-Exception.html
